Lab 2: Bluetooth
Objective
In the last lab, we learned to communicate with the Artemis board via the serial port. This time, we are asked to establish the bluetooth communication between the personal computer and the Artemis board. The lab is divided into two parts: computer and Artemis board setup and required tasks. I will walk through the setup briefly to explain the environment that we are working on, and go into details about the tasks, including sending and receiving data, differneces between distinct approaches, and the performance evaluation.
Computer and Artemis Board Setup
-
Computer
First, we need to make sure Python 3 and pip are installed on the computer. Then, we installed a virtual environment to run the code packages which will be isolated from the computer’s current operating system. After the installation, we install python packages in this virtual environment to start Jupyter lab, which is an online interactive coding and documenting platform, which allows us to implement the tasks required individually under the bluetooth connection.
-
Artemis Board
As for the Artemis board, we installed ArduinoBLE (Bluetooth Low Energy) library to our Arduino IDE and load the sketch provided to the board.
-
Configuration
Before establishing the connection, we need to modify the ‘artemis_address’ in the configuration file on Jupyter notebook to the MAC address shown in the serial window. Here’s what it look like on my end:
artemis_address: 'c0:07:30:8e:08:44'Also, make sure the UUIDs used in the Arduino file matches the information in the python configuration file.
Tasks
After all the setup, we perform some tasks to show the functionality of the bluetooth communication. The following video showcases all the tasks required in this lab:
-
Send an ECHO command with a string value from the computer to the Artemis board, and receive an augmented string on the computer.
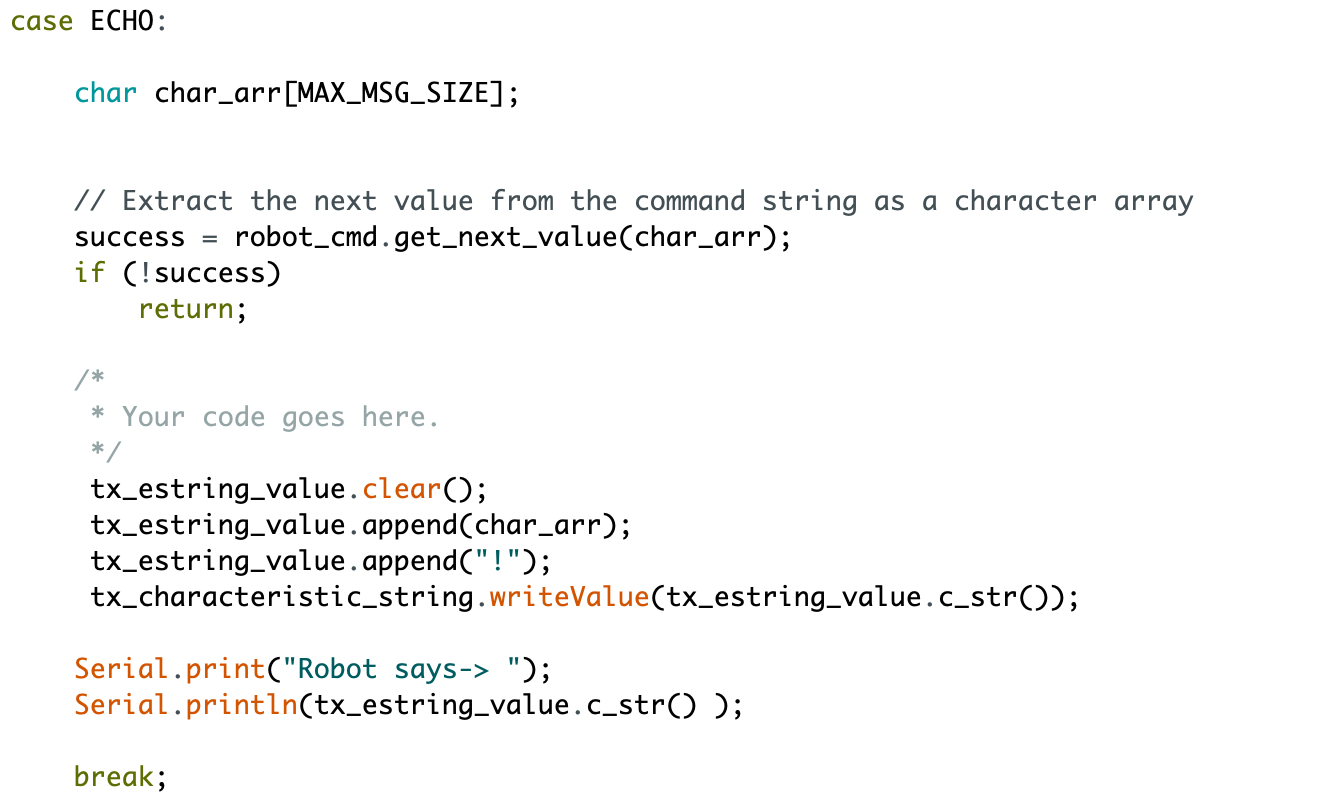
On the computer side, I use ‘send_command’ function and specify the command as ‘ECHO’ to send a string “HiHello” to the Artemis board. To receive the string back, I created a variable ‘str’ to store the data returned the function ‘receive_string’. I print the outcome on Jupyter notebook, and it showed exactly ‘HiHello’ as the output of the string, which means the string did get sent back and forth between the computer and the Artemis board. On the Artemis end, I updated the ‘ECHO’ command case in ‘handle_command()’ function in Arduino IDE, and the code snippet is shown as below. The string received from the connection would also be printed on the serial window.
-
Send three floats to the Artemis board using the SEND_THREE_FLOATS command and extract the three float values in the Arduino sketch.
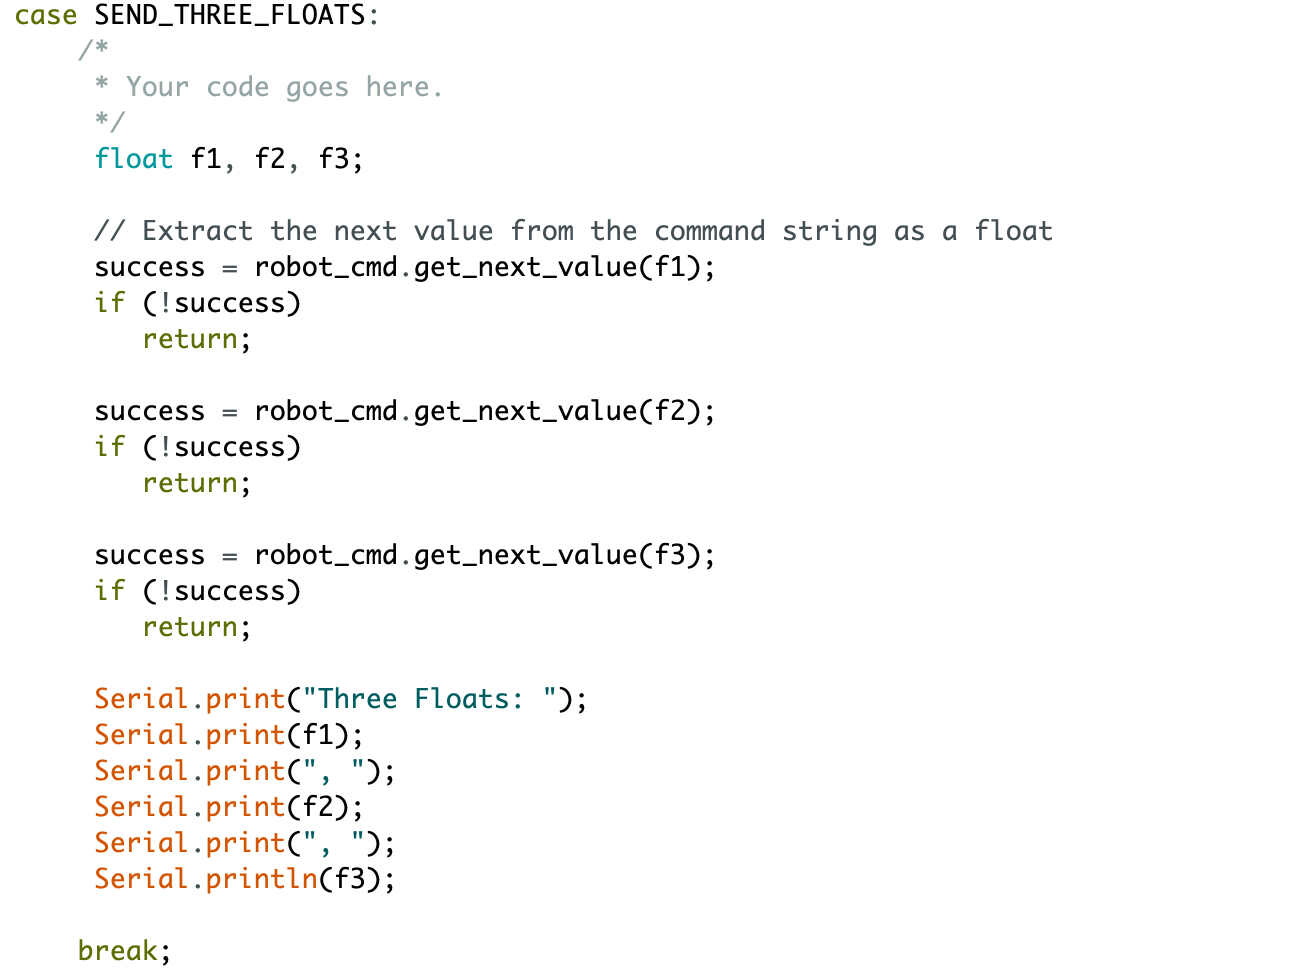
This task is similar as the first one, but instead of printing the data received directly, the data needs to be printed separately. I modified the command sent to Artemis as ‘SEND_THREE_FLOATS’, and the each float sent is separated by a ‘|’ symbol, defined as the end of a value substring in an Artemis header file. On the Artemi side, I updated the details in case SEND_THREE_FLOATS in handle_command() to perform the task.
- Setup a notification handler in Python to receive the float value (the BLEFloatCharactersitic in Arduino) from the Artemis board. In the callback function, store the float value into a (global) variable such that it is updated every time the characteristic value changes.
As described in ArtemisBLEController section in the lab document, notification handler is a function callback which must accepts two inputs: uuid string object and the bytearray of the characteristic value. I defined a function called ‘notification_handler’ to store and print the float value that it receives every time the data updates.def notification_handler(uuid, byteArray): global floatValue floatValue = ble.bytearray_to_float(byteArray) print(floatValue)Then, I use ‘start_notify’, which takes the uuid and the notification handler as inputs, to activate notifications on the GATT characteristics.
ble.start_notify(ble.uuid['RX_FLOAT'], notification_handler)Since the write_data() defined in the code on the Artemis board updates the data every 500 ms, the floats we seen always updated the seconds from the time since the Arduino starts by an interval of 0.5 s.
- In your report, briefly explain the difference between the two approaches:
(1) Receive a float value in Python using receive_float() on a characteristic that is defined as BLEFloatCharactersitic in the Arduino side.
(2) Receive a float value in Python using receive_string() (and subsequently converting it to a float type in Python) on a characteristic that is defined as a BLECStringCharactersitic in the Arduino side.
The receive_float() is more intuitive to implement since the value is already in float type and the receive_float() has already implemented the bytearray to float function to capture the data. If we use receive_string() instead, we need to modify the bytearray_to_string to decode strings and convert the decoded string into floats, which is hard to implement. The characters in bytearrays can be differnent, so it’s hard to define when to stop reading and converting it into a number.
Additional Task
Perform an analysis on the communication performance.
- Effective Data Rate: Send a message from the computer and receive a reply from the Artemis board. Note the respective times for each event, calculate the data rate and include at least one plot to support your write-up.
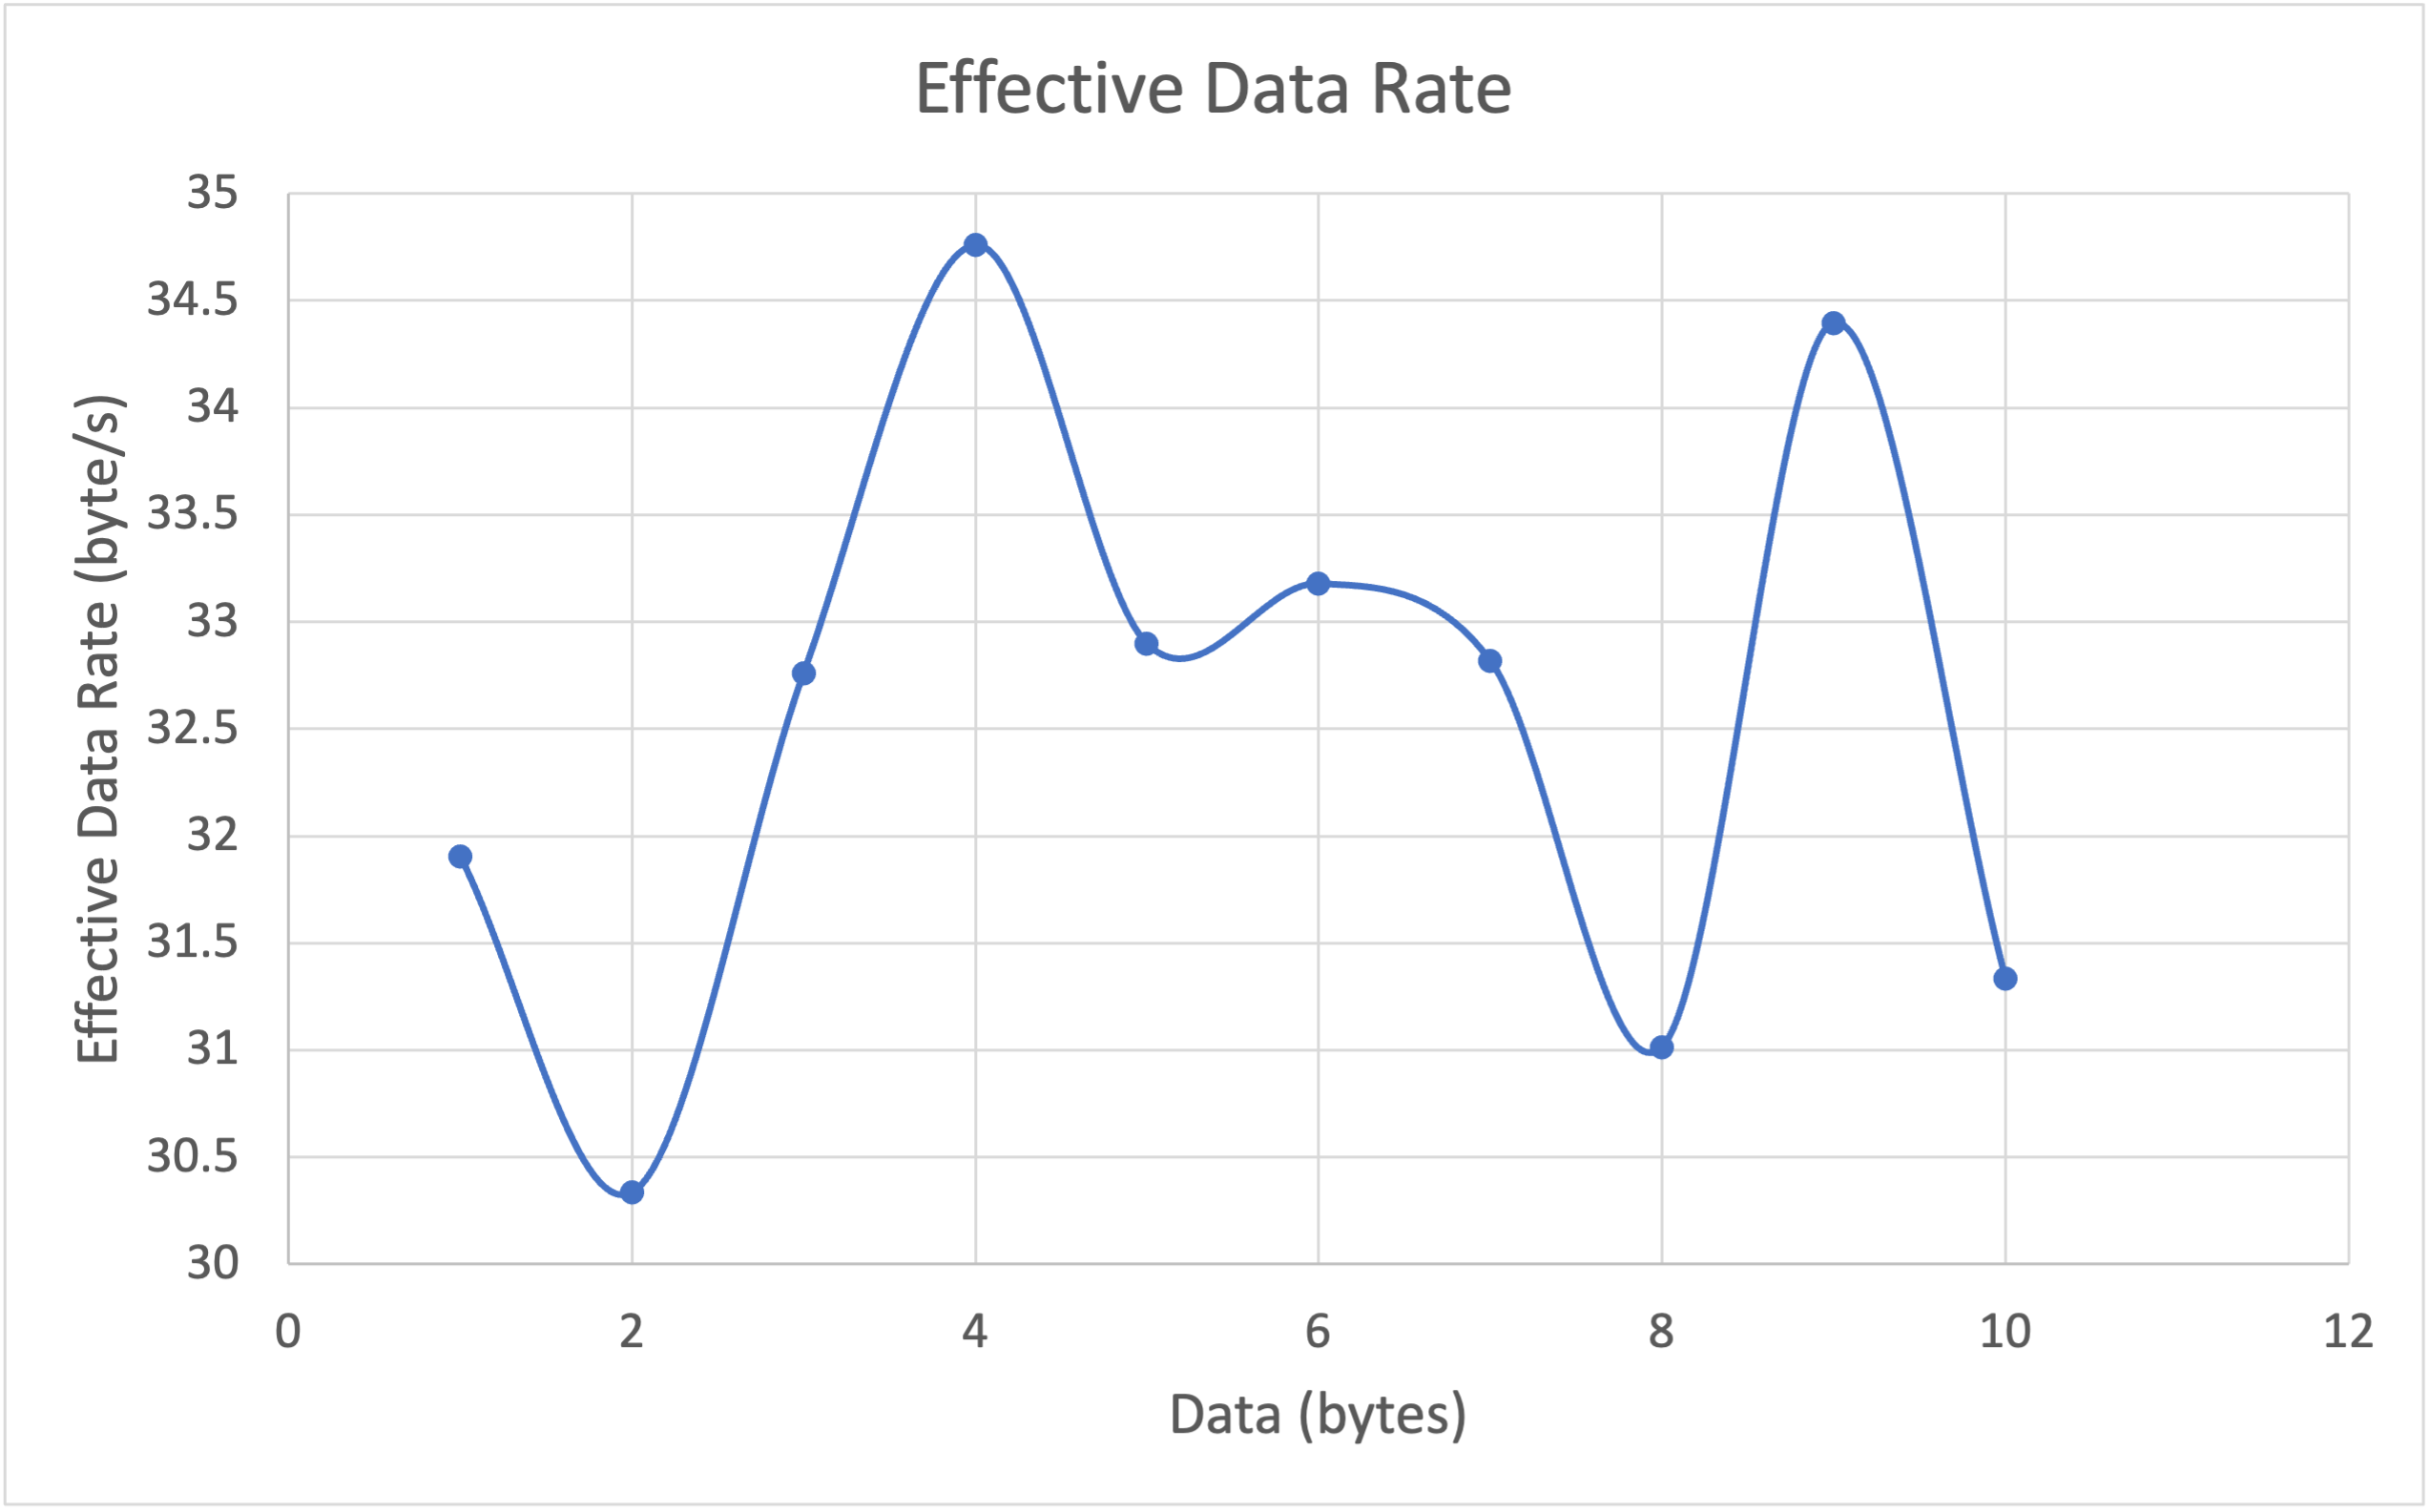
Effective data rate refers to the average number of units of data is transferred per unit time between the sender and the receiver. I wrote a ‘performance’ function to doceument the average time required to complete data transmission by sending a message. The message contains different numbers of ‘a’s and this represents the performance for message with distinct bytes. As shown in the picture, the effective data rate ranges from around 30 to 34 bytes per second when transmitting 1 to 10 bytes of data.totalTime = 0 message = "" def performance(): ble.send_command(CMD.ECHO, message) start = time.time() str = ble.receive_string(ble.uuid['RX_STRING']) end = time.time() print(str) timePeriod = end - start return timePeriodfor i in range (10): message = message + 'a' totalTime = performance() print(totalTime)
- Reliability: What happens when you send data at a higher rate from the robot to the computer?
I switched the baud rate to 460800 for this task, and the data is still processed perfectly as the original 115200 baud rate. That means the computer can still read all data even at a higher rate.